
| 일 | 월 | 화 | 수 | 목 | 금 | 토 |
|---|---|---|---|---|---|---|
| 1 | 2 | 3 | 4 | 5 | 6 | 7 |
| 8 | 9 | 10 | 11 | 12 | 13 | 14 |
| 15 | 16 | 17 | 18 | 19 | 20 | 21 |
| 22 | 23 | 24 | 25 | 26 | 27 | 28 |
- centos7
- JSP
- apache openmeetings
- postgresql
- 웹화상회의
- zoom
- zoom OkHttpClient
- ubuntu
- jboss
- java
- zoom api
- AWS
- db
- 데이터베이스
- 줌 채팅
- 아파치 openmeetings
- 아파치 오픈미팅
- 리눅스
- 명령어
- centos
- zoom 서버통신
- wildfly
- mysql
- 줌 개발
- zoom OkHttp
- 줌 녹화
- zoom sdk
- 화상회의
- tomcat
- openmeetings
- Today
- Total
StartIT
zoom api 이용하기 - 2 본문
zoom api 이용하기(1)
tobepro.tistory.com/35 zoom iframe 으로 크기 조절하기 tobepro.tistory.com/32?category=441528 zoom sdk 이용하기(web) 코로나의 여파로 인해 zoom같은 비대면 화상 회의에 대한 수요가 급증하고 있다. 이번에..
tobepro.tistory.com
우리는 위 포스팅을 통해 zoom api 이용을 시도해봤다.
하지만 CORS 정책에 의해 막히고 말았는데, zoom developer forum사이트에서 찾은 방법을 한 번 적용해서 해결을 해보도록 하자.

tommy 스태프가 답변한 내용을 보면,
"Yes, the Zoom API must be called from the server side / backend. If called from the client side / frontend, you will get CORs errors."
zoom api는 반드시 서버사이드 즉 백엔드에서 불려져야 한다. 클라이언트단 즉 프론트엔드에서 호출을 하게 되면 너는 CORS에러를 갖게 될 것이다...
우리가 계속 CORS에러를 갖게 된 이유는 프론트엔드에서 계속 호출을 했기 때문에 이런 에러를 갖게 된 것이다.
여기서 클라이언트단과 서버단에서 실행되는 것에 차이를 알아야 하는데, 쉽게 생각하면
유저가 보이는 화면에서 실행된다 - 프론트엔드
유저가 보이지 않는 화면에서 실행이 된다 - 백엔드
로 생각하면 될 것 같다.
예를 들어 자바스크립트나 css, html 같은 경우, 화면에서 바로 보이는 부분들이 수정되는 것이기 때문에 프론트엔드라고 볼 수 있다.
db나 자바 등은 화면에서 보이는 부분들이 수정되는 것이 아니기 때문에 백엔드라고 볼 수 있다.
자바스크립트 같은 경우는 앞서 말했듯이 프론트엔드인데
가장 먼저 해결책으로 나오는 것은 node.js를 통해 js파일을 서버단에서 실행하라는 답변이 가장 많이 나온다. 하지만 우린 이미 tomcat서버를 활용하기로 했으니 이는 통과. 다른 방법을 찾아야 한다.
내가 찾은 방법은 jsp파일을 활용하여 java로 처리를 하는 방법이다.
jsp에서는 쉽게 생각하면 자바를 먼저 서버단으로 실행을 하고, 이후 자바스크립트를 클라이언트단으로 실행을 하기 때문에 자바에서 서버단으로 처리가 가능하다.
다시 zoom api 관련 서류에 get Meeting Recordings부분으로 가서
marketplace.zoom.us/docs/api-reference/zoom-api/cloud-recording/recordingget
Get Meeting Recordings - Cloud Recording - Zoom API - API Reference
Get all the recordings from a meeting or a Webinar. The recording files can be downloaded via the download_url property listed in the response. To acce...
marketplace.zoom.us

Language를 java로 선택하여 코드를 확인하도록 한다. 나는 OkHttp 라이브러리를 사용하기 위해 OkHttp를 선택했다.
이제 이 코드를 복사 후 meeting_iframe.html을 수정한다.
|
1
2
3
4
5
6
7
8
9
10
11
12
13
14
15
16
17
18
19
20
21
22
|
<%@ page contentType="text/html; charset=utf-8"%>
<%@ page import="java.util.*"%>
<%@ page import="com.squareup.okhttp.*"%>
<%
OkHttpClient client = new OkHttpClient();
String zoomUrl = "https://api.zoom.us/v2/meetings/**********/recordings";
String auth = "*********************************************************************************************************************************";
Request zoomRequest = new Request.Builder()
.url(zoomUrl)
.get()
.addHeader("authorization", "Bearer "+auth)
.build();
Response zoomResponse = client.newCall(zoomRequest).execute();
String zoomText = zoomResponse.body().string();
%>
<scrit>
function getMeeting(){
console.log("<%=zoomText%>");
}
</scrit>
|
cs |
meeting_iframe.html은 이제 jsp로 바꿔서 사용을 할 것이므로, 확장자를 jsp로 바꾼 뒤 다시 확인을 한다.

에러가 나서 확인을 해보면
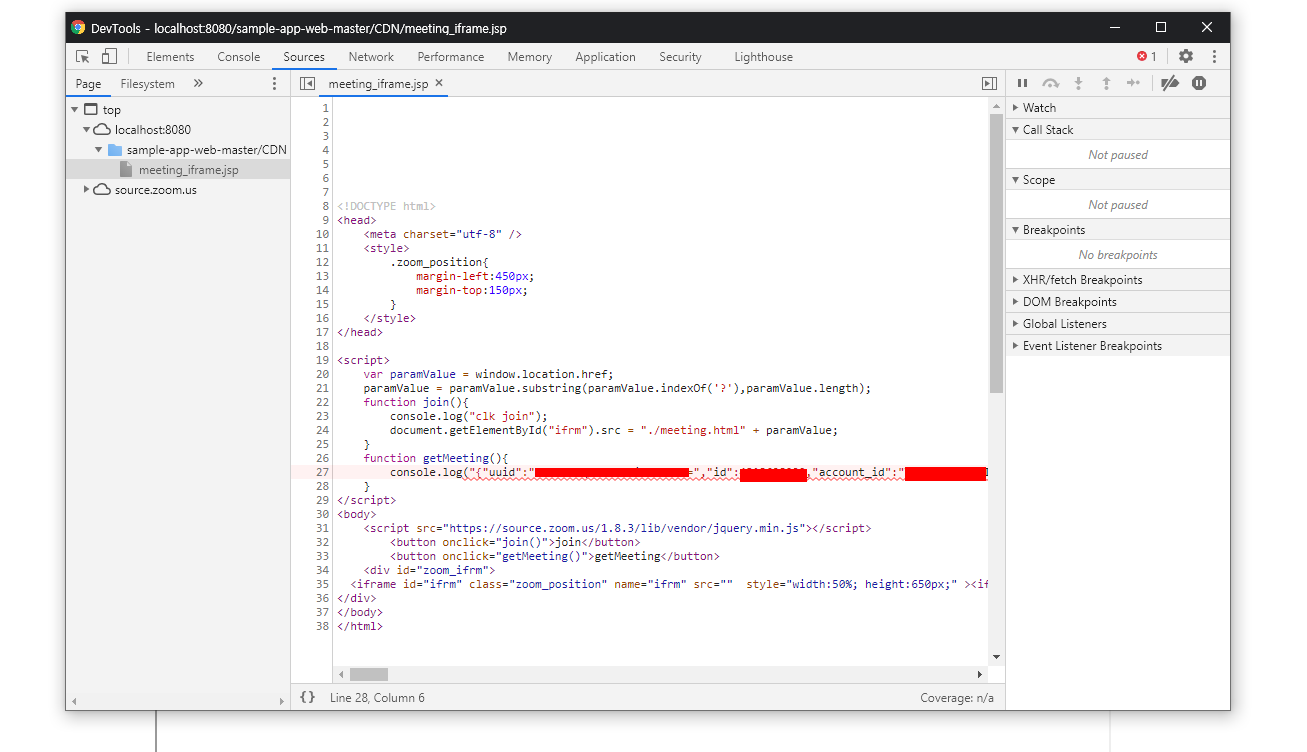
값은 제대로 받아오는 것을 알 수 있다.
json object로 받아온 값을 적당한 파싱을 통해 string으로 변환해서 넣은 게 아니라 그냥 ""로 둘러싸여 넣은 형태이기 때문에 에러가 나온 것이다.
제대로 변환을 해서 확인을 해보면
|
1
2
3
4
5
6
7
8
9
10
11
12
13
14
15
16
17
18
|
<%@ page import="org.json.simple.JSONObject"%>
<%@ page import="org.json.simple.JSONArray"%>
<%@ page import="org.json.simple.parser.JSONParser"%>
<%@ page import="org.json.simple.parser.ParseException"%>
<%
String zoomText = zoomResponse.body().string();
JSONParser parser = new JSONParser();
JSONObject jObj = (JSONObject)parser.parse(zoomText);
%>
<script>
function getMeeting(){
var jsonObj = <%=jObj%>;
console.log(jsonObj);
}
</script>
|
cs |
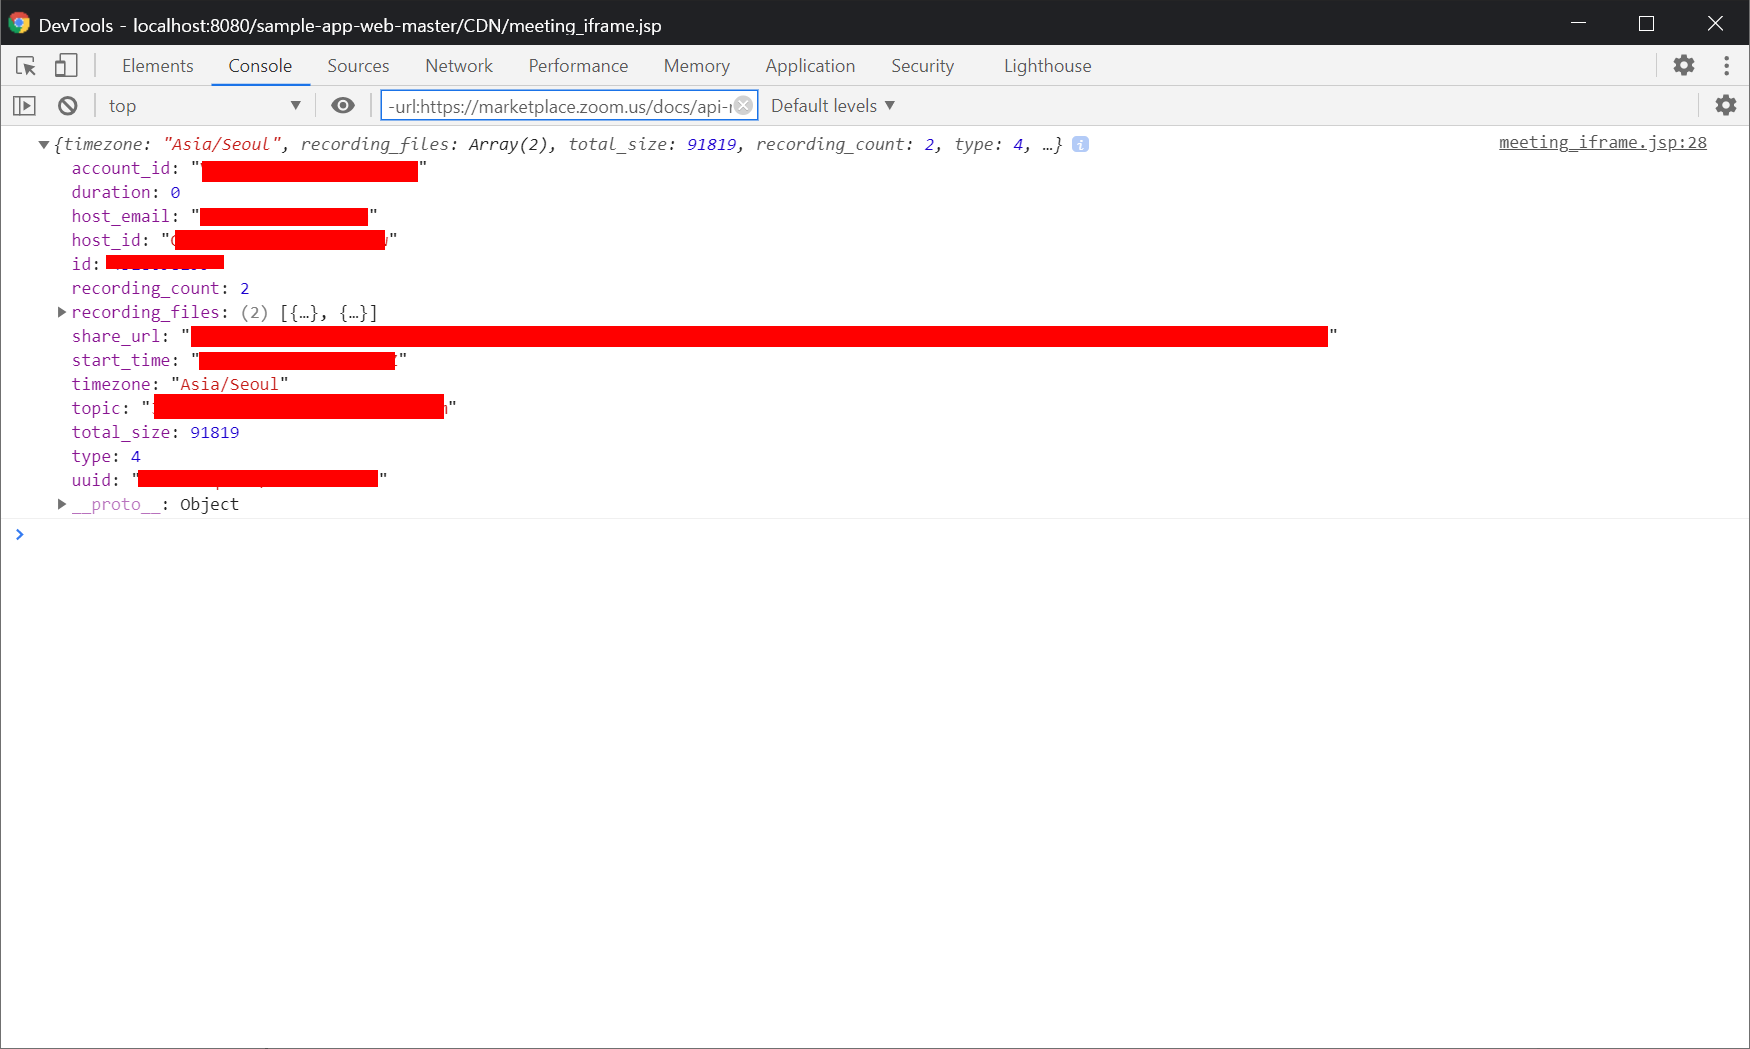
이제 버튼을 누르면 json 형태의 값들을 확인해 볼 수 있다.
우리가 써야 하는 녹화영상에 관한 데이터는 recording_files에 담겨 있다.
이제 download버튼을 2개 만들어서, 이 클라우드에 저장되어 있는 영상과 채팅 로그를 다운로드 받아보도록 하자.
|
1
2
3
4
5
|
<script>
<button onclick="getRec()">getRec</button>
<button onclick="getChatLog()">getChatLog</button>
</script>
|
cs |
버튼을 만들고
|
1
2
3
4
5
6
7
8
9
10
11
12
13
14
15
16
17
18
19
20
21
22
|
<%
JSONArray jArray = (JSONArray)jObj.get("recording_files");
String recUrl ="";
String chatUrl ="";
JSONObject json = null;
for(int i=0; i<jArray.size(); i++){
json = (JSONObject)jArray.get(i);
if(json.get("file_type").equals("MP4"))
recUrl = (String)json.get("download_url");
else if(json.get("file_type").equals("CHAT"))
chatUrl = (String)json.get("download_url");
}
%>
<script>
function getRec(){
location.replace("<%=recUrl%>?access_token=<%=auth%>");
}
function getChatLog(){
location.replace("<%=chatUrl%>?access_token=<%=auth%>");
}
</script>
|
cs |
버튼을 눌렀을 때 각각에 해당되는 download_url을 실행하여 다운로드를 진행하도록 하였다.

여기까지 하면 기본적인 zoom api 이용하는 것에 대해 완성한 거 같다.
이 밖에 다른 api 기능은 zoom api 문서 사이트를 통해 몇 가지를 수정해서 사용하면 될 것이다.
@@@@@@@@추가
이상하게도 Get Meeting Recordings api를 사용하면 가장 마지막 녹화기록만 가져오는 경우가 발생한다. 그래서 List All Recordings를 가져다가 다시 사용했다.
marketplace.zoom.us/docs/api-reference/zoom-api/cloud-recording/recordingslist
List All Recordings - Cloud Recording - Zoom API - API Reference
When a user records a meeting or a webinar by choosing the Record to the Cloud option, the video, audio, and chat text are recorded in the Zoom cloud. ...
marketplace.zoom.us
전체 소스는
|
1
2
3
4
5
6
7
8
9
10
11
12
13
14
15
16
17
18
19
20
21
22
23
24
25
26
27
28
29
30
31
32
33
34
35
36
37
38
39
40
41
42
43
44
45
46
47
48
49
50
51
52
53
54
55
56
57
58
59
60
61
62
63
64
65
66
67
68
69
70
71
72
73
74
75
76
77
78
79
80
81
82
83
84
85
86
87
88
|
<%@ page contentType="text/html; charset=utf-8"%>
<%@ page import="java.util.*"%>
<%@ page import="org.json.simple.JSONObject"%>
<%@ page import="org.json.simple.JSONArray"%>
<%@ page import="org.json.simple.parser.JSONParser"%>
<%@ page import="org.json.simple.parser.ParseException"%>
<%@ page import="com.squareup.okhttp.*"%>
<!DOCTYPE html>
<head>
<meta charset="utf-8" />
<style>
.zoom_position{
margin-left:450px;
margin-top:150px;
}
</style>
</head>
<%
OkHttpClient client = new OkHttpClient();
//String zoomUrl = "https://api.zoom.us/v2/meetings/*******/recordings?from=2020-11-24&to=2020-11-24";
String zoomUrl = "https://api.zoom.us/v2/users/*********/recordings?from=2020-11-24&to=2020-11-24";
String auth = "*****************************************************************************************************************************";
Request zoomRequest = new Request.Builder()
.url(zoomUrl)
.get()
.addHeader("authorization", "Bearer "+auth)
.build();
Response zoomResponse = client.newCall(zoomRequest).execute();
String zoomText = zoomResponse.body().string();
JSONParser parser = new JSONParser();
JSONObject jObj = (JSONObject)parser.parse(zoomText);
JSONArray jArray = (JSONArray)jObj.get("meetings");
JSONObject json = null;
for(int i=0; i<jArray.size(); i++){
json = (JSONObject)jArray.get(i);
if((Long)json.get("id")==*********){
json = (JSONObject)jArray.get(i);
jArray =(JSONArray)json.get("recording_files");
break;
}
}
String recUrl =null;
String chatUrl =null;
for(int i=0; i<jArray.size(); i++){
json = (JSONObject)jArray.get(i);
if(json.get("file_type").equals("MP4"))
recUrl = (String)json.get("download_url");
else if(json.get("file_type").equals("CHAT"))
chatUrl = (String)json.get("download_url");
}
%>
<script>
var paramValue = window.location.href;
paramValue = paramValue.substring(paramValue.indexOf('?'),paramValue.length);
function join(){
console.log("clk join");
document.getElementById("ifrm").src = "./meeting.html" + paramValue;
}
function getMeeting(){
var jsonObj = <%=jObj%>;
console.log(jsonObj);
}
function getRec(){
location.replace("<%=recUrl%>?access_token=<%=auth%>");
}
function getChatLog(){
location.replace("<%=chatUrl%>?access_token=<%=auth%>");
}
</script>
<body>
<script src="https://source.zoom.us/1.8.3/lib/vendor/jquery.min.js"></script>
<button onclick="join()">join</button>
<button onclick="getMeeting()">getMeeting</button>
<button onclick="getRec()">getRec</button>
<button onclick="getChatLog()">getChatLog</button>
<div id="zoom_ifrm">
<iframe id="ifrm" class="zoom_position" name="ifrm" src="" style="width:50%; height:650px;" ><iframe>
</div>
</body>
</html>
|
cs |
zoom api 이용하기 - 3
tobepro.tistory.com/37?category=441528 zoom api 이용하기 - 2 tobepro.tistory.com/36 zoom api 이용하기(1) tobepro.tistory.com/35 zoom iframe 으로 크기 조절하기 tobepro.tistory.com/32?category=441528..
tobepro.tistory.com
에서 마무리...
참고
JSONObject, JSONArray, JSONParser 사용해 데이터 만들어 파싱하기
1. 사전작업 JSON을 사용하기 위해선 json-simple-1.1.1.jar 라는 라이브러리 파일이 필요하다. maven이나 구글링을 통해 json사용에 필요한 jar 파일을 다운받고 프로젝트 속성 > java build path > Libraries >..
shlee0882.tistory.com
'api > zoom' 카테고리의 다른 글
| zoom api 이용하기 - 3 (10) | 2020.12.08 |
|---|---|
| zoom api 이용하기 - 1 (0) | 2020.12.02 |
| zoom iframe 으로 크기 조절하기 (0) | 2020.11.26 |
| zoom sdk 이용하기(web) (4) | 2020.11.26 |


