
| 일 | 월 | 화 | 수 | 목 | 금 | 토 |
|---|---|---|---|---|---|---|
| 1 | 2 | 3 | 4 | |||
| 5 | 6 | 7 | 8 | 9 | 10 | 11 |
| 12 | 13 | 14 | 15 | 16 | 17 | 18 |
| 19 | 20 | 21 | 22 | 23 | 24 | 25 |
| 26 | 27 | 28 | 29 | 30 | 31 |
- jboss
- 아파치 오픈미팅
- centos7
- 아파치 openmeetings
- centos
- wildfly
- JSP
- 웹화상회의
- ubuntu
- zoom api
- mysql
- AWS
- tomcat
- zoom 서버통신
- zoom sdk
- 줌 녹화
- zoom OkHttp
- zoom
- postgresql
- zoom OkHttpClient
- 명령어
- 줌 개발
- 데이터베이스
- db
- 리눅스
- 줌 채팅
- 화상회의
- java
- apache openmeetings
- openmeetings
- Today
- Total
StartIT
zoom iframe 으로 크기 조절하기 본문
tobepro.tistory.com/32?category=441528
zoom sdk 이용하기(web)
코로나의 여파로 인해 zoom 같은 비대면 화상 회의에 대한 수요가 급증하고 있다. 이번에는 zoom sdk를 이용하여 화상회의를 웹상에서 할 수 있는 sample 개발을 진행해보도록 하자. 먼저 marketplace.zoom
tobepro.tistory.com
윗글을 통해 web버전용 sdk를 설치하고, local 또는 https환경 세팅까지 마무리했으면
이제 zoom을 좀 더 커스텀을 해보도록 하자.
일단 meeting.html을 보면
1 2 3 4 5 6 7 8 9 10 11 12 13 14 15 16 17 18 19 20 21 22 23 24 25 26 27 28 29 30 31 32 33 | <!DOCTYPE html> <head> <title>Zoom WebSDK</title> <meta charset="utf-8" /> <link type="text/css" rel="stylesheet" href="https://source.zoom.us/1.8.3/css/bootstrap.css" /> <link type="text/css" rel="stylesheet" href="https://source.zoom.us/1.8.3/css/react-select.css" /> <meta name="format-detection" content="telephone=no"> <meta name="viewport" content="width=device-width, initial-scale=1, maximum-scale=1, user-scalable=no"> <meta http-equiv="origin-trial" content=""> </head> <body> <script src="https://source.zoom.us/1.8.3/lib/vendor/react.min.js"></script> <script src="https://source.zoom.us/1.8.3/lib/vendor/react-dom.min.js"></script> <script src="https://source.zoom.us/1.8.3/lib/vendor/redux.min.js"></script> <script src="https://source.zoom.us/1.8.3/lib/vendor/redux-thunk.min.js"></script> <script src="https://source.zoom.us/1.8.3/lib/vendor/jquery.min.js"></script> <script src="https://source.zoom.us/1.8.3/lib/vendor/lodash.min.js"></script> <script src="https://source.zoom.us/zoom-meeting-1.8.3.min.js"></script> <script src="js/tool.js"></script> <script src="js/vconsole.min.js"></script> <script src="js/meeting.js"></script> <script> const simd = async () => WebAssembly.validate(new Uint8Array([0, 97, 115, 109, 1, 0, 0, 0, 1, 4, 1, 96, 0, 0, 3, 2, 1, 0, 10, 9, 1, 7, 0, 65, 0, 253, 15, 26, 11])) simd().then((res) => { console.log("simd check", res); }); </script> </body> </html> | cs |
매우 간단하게 되어있다!?
버튼 크기라든가 화면 크기, 텍스트 크기 등 UI에 대해 수정을 하고 싶지만 css나 html, js파일을 다 네트워크를 통해 불러와서 직접적인 수정을 할 수가 없다.
가장 기본적인 zoom 화면을 항상 화면에 꽉 차게 사용하게 된다는 점이다.
Zoom Developer Forum
Post your questions on the Forum and get help from Zoom Developer Support.
devforum.zoom.us
에 의하면 아직 UI를 컨트롤하는 부분에 대한 개발은 진행되지 않은 듯하다.
css를 통해서 크기를 컨트롤할 수는 있다고 한다.
하지만 우린 css가 아닌 iframe을 통해 iframe의 사이즈를 조절하는 방식으로 줌의 크기 조절을 할 생각이다.
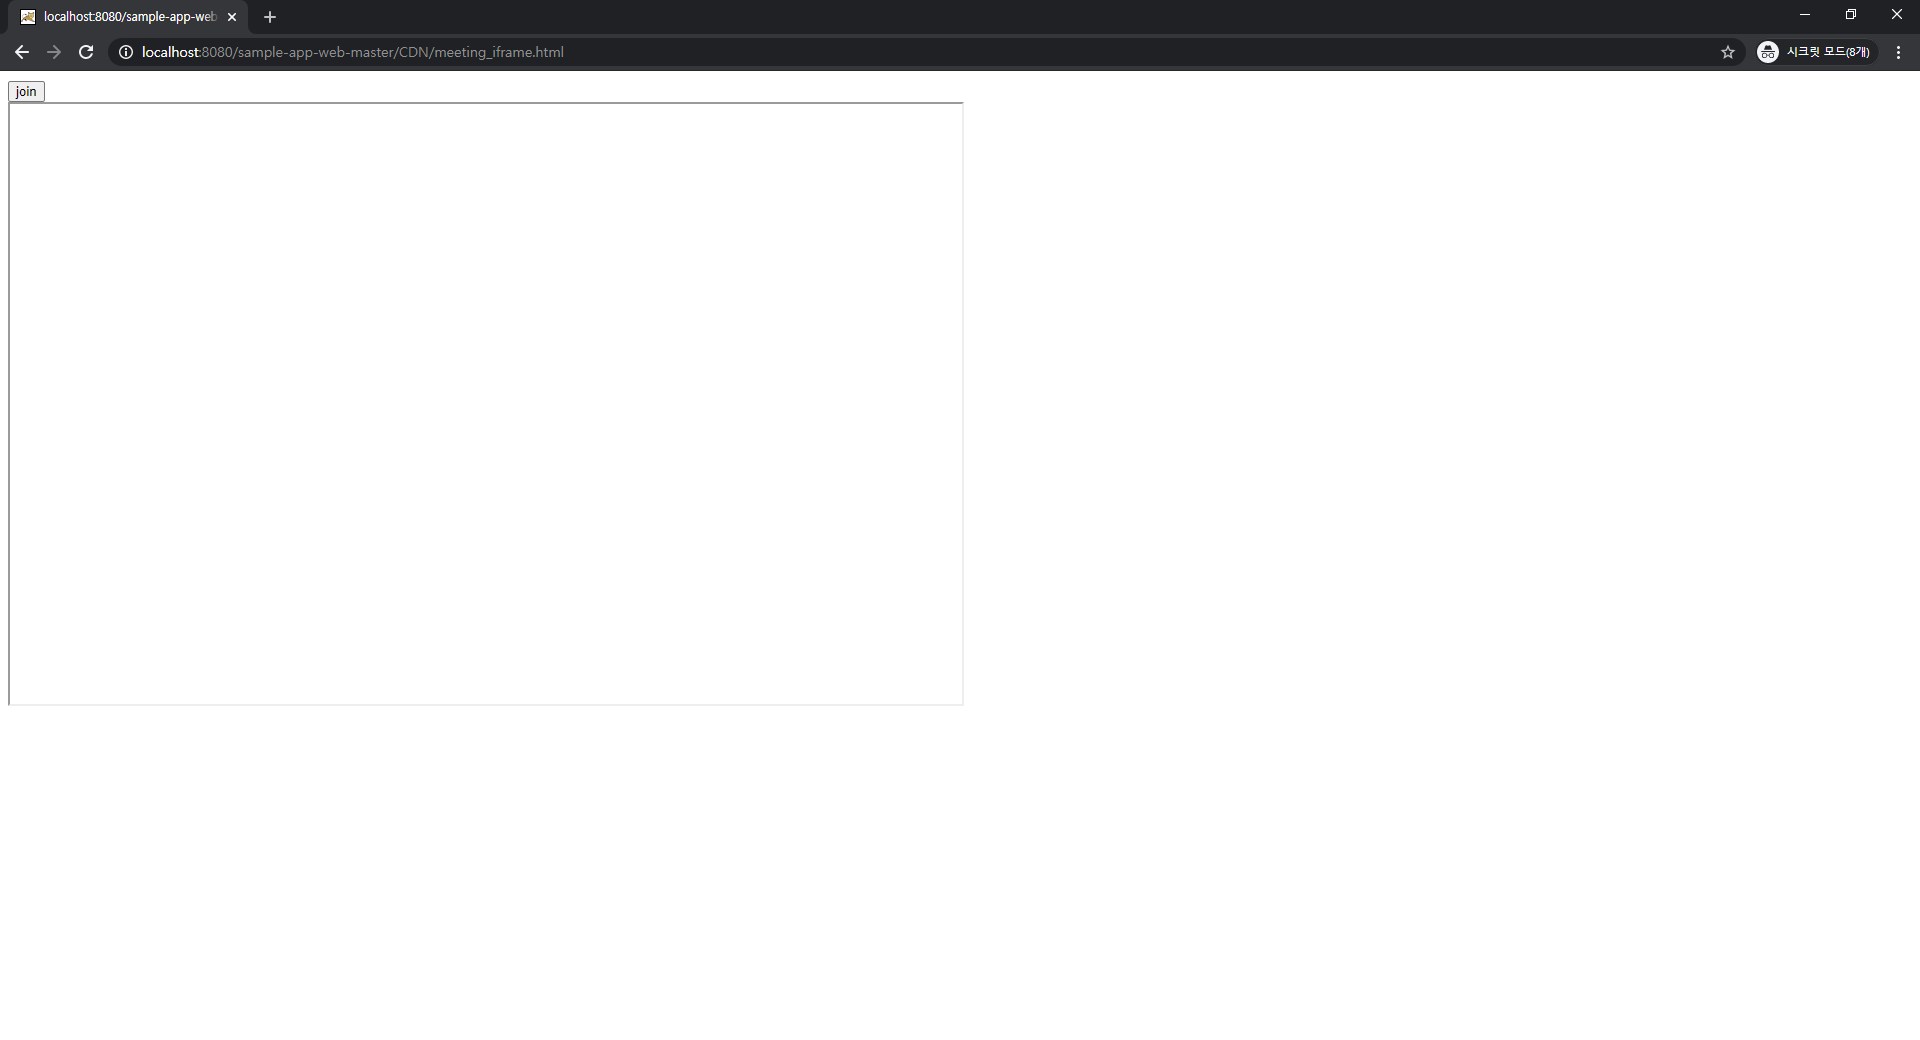
먼저 간단하게 zoom이 iframe으로 들어갈 html 파일 하나를 만들어 보자.
파일명은 meeting_iframe.html로 하여 하나 만든다.
1 2 3 4 5 6 7 8 9 10 | <!DOCTYPE html> <head> <meta charset="utf-8" /> <body> <button>join</button> <div id="zoom_ifrm"> <iframe id="ifrm" name="ifrm" src="" style="width:50%; height:600px;" ><iframe> </div> </body> </html> | cs |
호스팅 또는 조인을 컨트롤 할 버튼과 zoom 화면이 채워질 iframe을 생성했다.
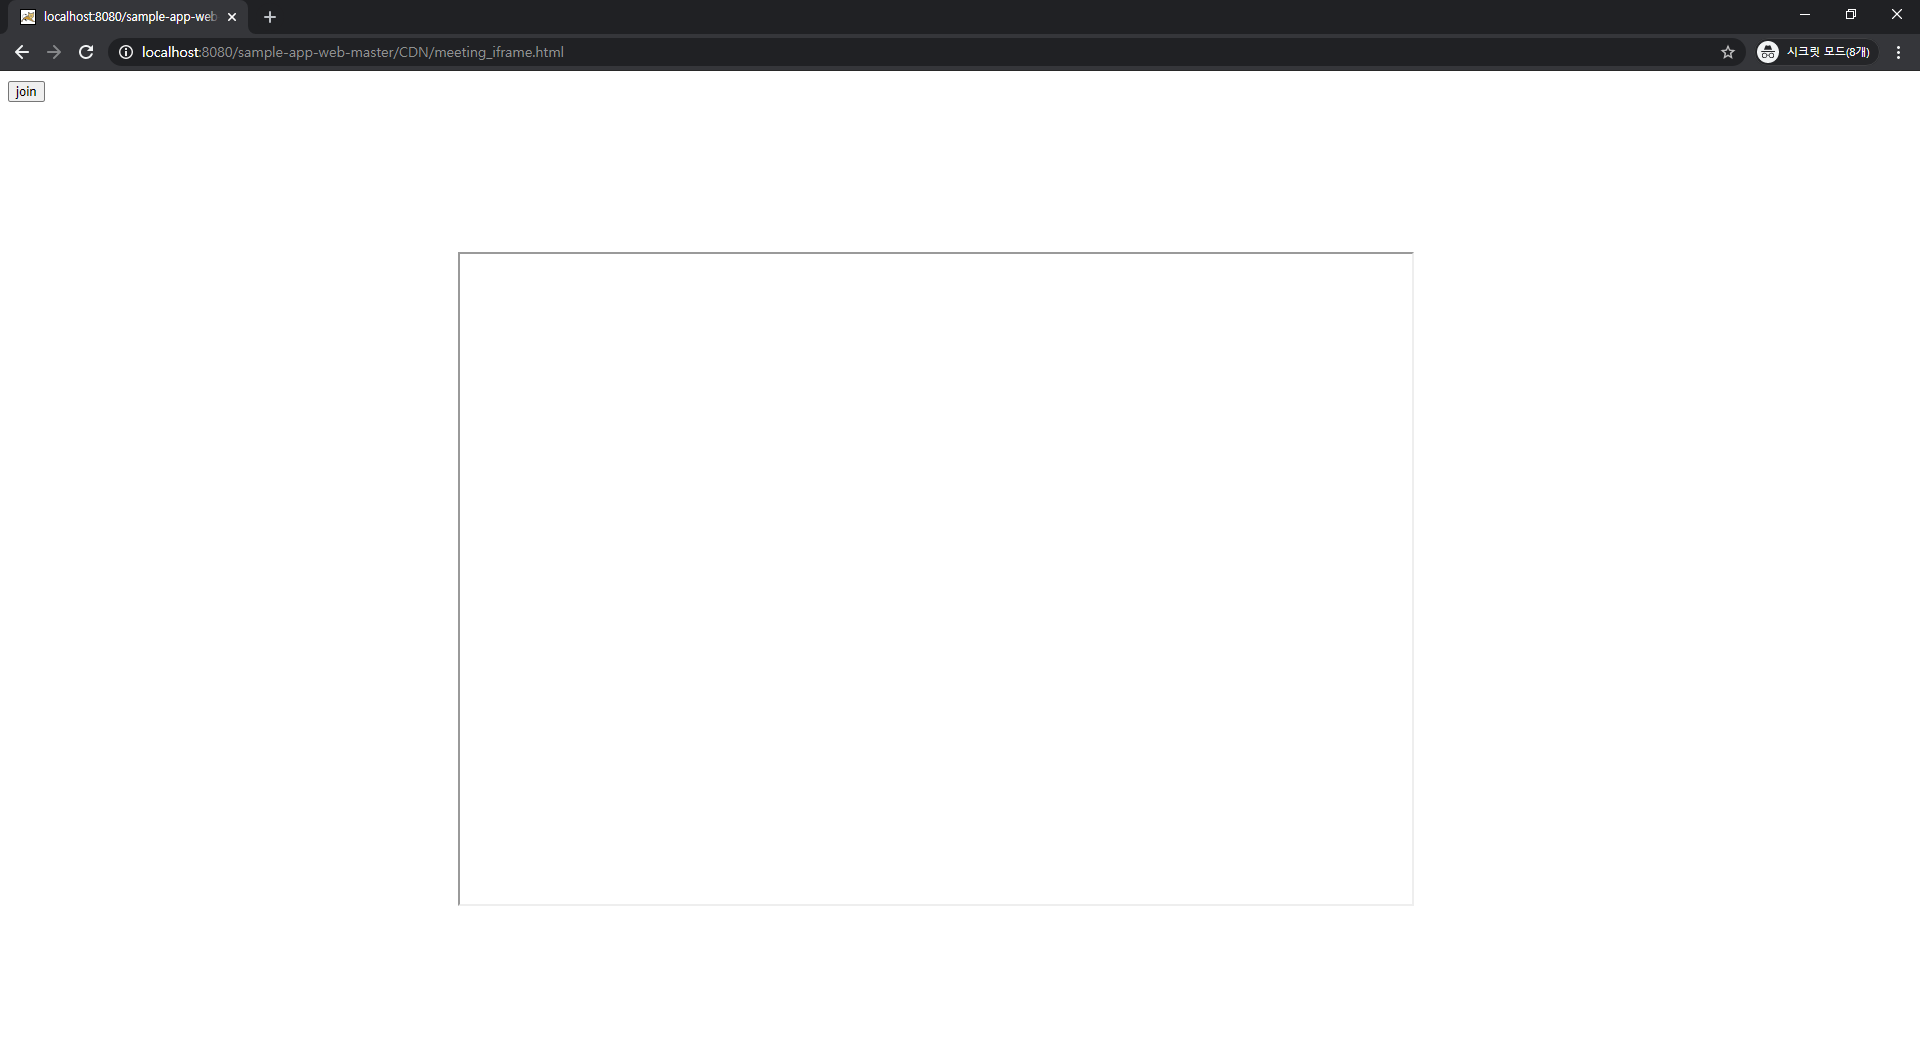
이제 이 화면에서 iframe영역을 가운데로 옮기기 위해 style을 추가하고
1 2 3 4 5 6 | <style> .zoom_position{ margin-left:450px; margin-top:150px; } </style> | cs |
ifrm에 해당 style class를 추가해준다.
1 | <iframe id="ifrm" class="zoom_position" name="ifrm" src="" style="width:50%; height:650px;" ><iframe> | cs |
굳이 이렇게 안 하고, style에 바로 #으로 id값을 주고 margin을 줘서 띄워도 된다.
이제 index.html에서 join버튼을 눌렀을 때 이 화면으로 넘어오게 되는데, 이때 index.html에서 설정한 값들을 parameter 값으로 가져오게 된다. 이 값들을 추출해서 이 화면에서 join버튼을 눌렀을 때 이전에 있던 meeting.html 파일로 넘겨줘서 이 html 파일을 저 가운데 iframe 화면으로 뛰우게 될 것이다.
그럼 먼저
1 2 3 4 | <script> var paramValue = window.location.href; paramValue = paramValue.substring(paramValue.indexOf('?'),paramValue.length); </script> | cs |
해당 스크립트를 통해 paramValue 변수에 url로 넘어온 ?이후의 parameter값을 저장한다.
1 2 3 4 5 6 | <script> function join(){ console.log("clk join"); document.getElementById("ifrm").src = "./meeting.html" + paramValue; } </script> | cs |
그 후 함수 하나를 작성하여, 이 함수를 누르면 콘솔 로그로 clk join 메시지가 나오고,
iframe에 비어있던 src 속성을 paramValue를 함께 넘겨줘서 html 파일을 실행한다.
최종 소스는 아래와 같이 된다.
1 2 3 4 5 6 7 8 9 10 11 12 13 14 15 16 17 18 19 20 21 22 23 24 25 26 27 28 | <!DOCTYPE html> <head> <meta charset="utf-8" /> <style> .zoom_position{ margin-left:450px; margin-top:150px; } </style> </head> <script> var paramValue = window.location.href; paramValue = paramValue.substring(paramValue.indexOf('?'),paramValue.length); function join(){ console.log("clk join"); document.getElementById("ifrm").src = "./meeting.html" + paramValue; } </script> <body> <td><button onclick="join()">join</button> <div id="zoom_ifrm"> <iframe id="ifrm" class="zoom_position" name="ifrm" src="" style="width:50%; height:650px;" ><iframe> </div> </body> </html> | cs |
이제 여기서 바로 index.html을 바로 실행하여 join을 누르면 이전에 meeting.html이 실행될 것이다.
index.js파일을 실행하여 join버튼을 눌렀을 때 실행되는 html파일 url을 수정하도록 하자.
1 2 3 4 5 6 7 8 9 10 11 12 13 14 15 16 17 18 19 20 21 22 23 24 25 26 27 28 29 30 | // click join meeting button document .getElementById("join_meeting") .addEventListener("click", function (e) { e.preventDefault(); var meetingConfig = testTool.getMeetingConfig(); if (!meetingConfig.mn || !meetingConfig.name) { alert("Meeting number or username is empty"); return false; } testTool.setCookie("meeting_number", meetingConfig.mn); testTool.setCookie("meeting_pwd", meetingConfig.pwd); var signature = ZoomMtg.generateSignature({ meetingNumber: meetingConfig.mn, apiKey: API_KEY, apiSecret: API_SECRET, role: meetingConfig.role, success: function (res) { console.log(res.result); meetingConfig.signature = res.result; meetingConfig.apiKey = API_KEY; var joinUrl = "./meeting_iframe.html?" + testTool.serialize(meetingConfig); console.log(joinUrl); window.open(joinUrl, "_blank"); }, }); }); | cs |
'api > zoom' 카테고리의 다른 글
| zoom api 이용하기 - 3 (10) | 2020.12.08 |
|---|---|
| zoom api 이용하기 - 2 (0) | 2020.12.08 |
| zoom api 이용하기 - 1 (0) | 2020.12.02 |
| zoom sdk 이용하기(web) (4) | 2020.11.26 |


